Home > Clothing-Gear-Tools

Review: Abbey Bike Tools’ Nearly Perfect Hanger Alignment Gauge

41 Comments
Support us! Bikerumor may earn a small commission from affiliate links in this article. Learn More

Abbey Bike Tools HAG hanger alignment gauge derailleur  (11)

The derailleur hanger is an interesting part of your bicycle that probably doesn’t get the attention it deserves. Originally one with the frame (still is on many bikes), the replaceable model was introduced so that if your derailleur was ripped off in a crash you could replace the hanger and save the bike. Many were made out of softer metal so that the hanger would break before the derailleur, which was fine until the number of gears in a cassette started creeping up, requiring more precision and a stiffer hanger.

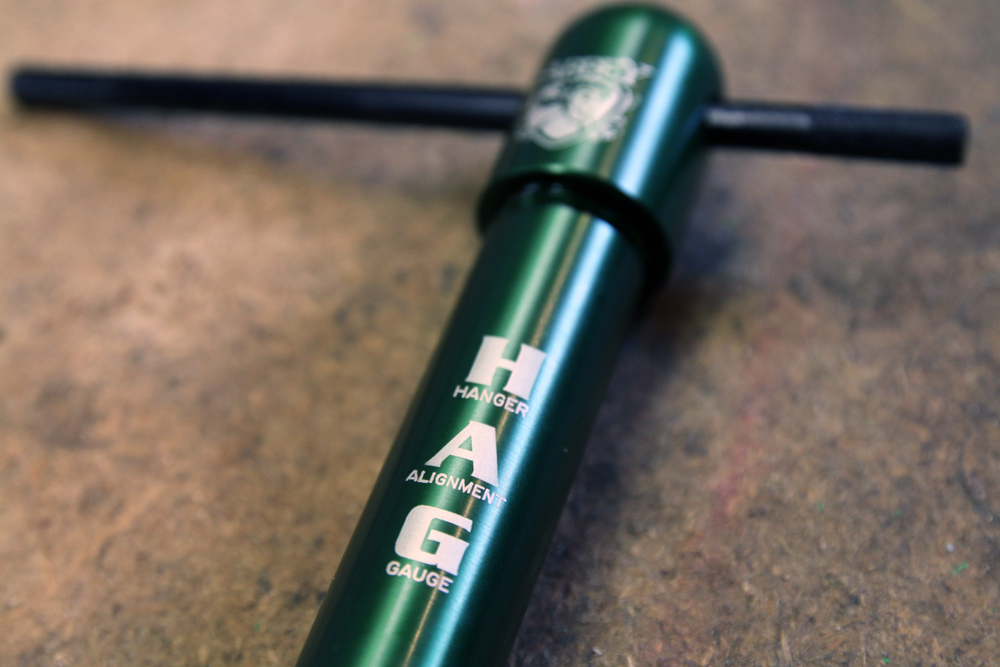
No matter what the frame though, one thing is universal – for the best shifting, the hanger has to be precisely aligned. That presents its own set of challenges as well as a number of tools to go along with it. Actually, just a handful of tools as the relatively simple hanger alignment gauge hasn’t seen much improvement over the years. In typical Abbey Bike Tools fashion, Jason Quade thought it could be done better. When he was done the Abbey HAG or Hanger Alignment Gauge was born.

Part Pry Bar and part Precision Measuring Instrument in Jason’s own words, using the HAG will make you want to check your hanger alignment a lot more often…

Abbey Bike Tools HAG hanger alignment gauge derailleur  (2)Abbey Bike Tools HAG hanger alignment gauge derailleur  (3)

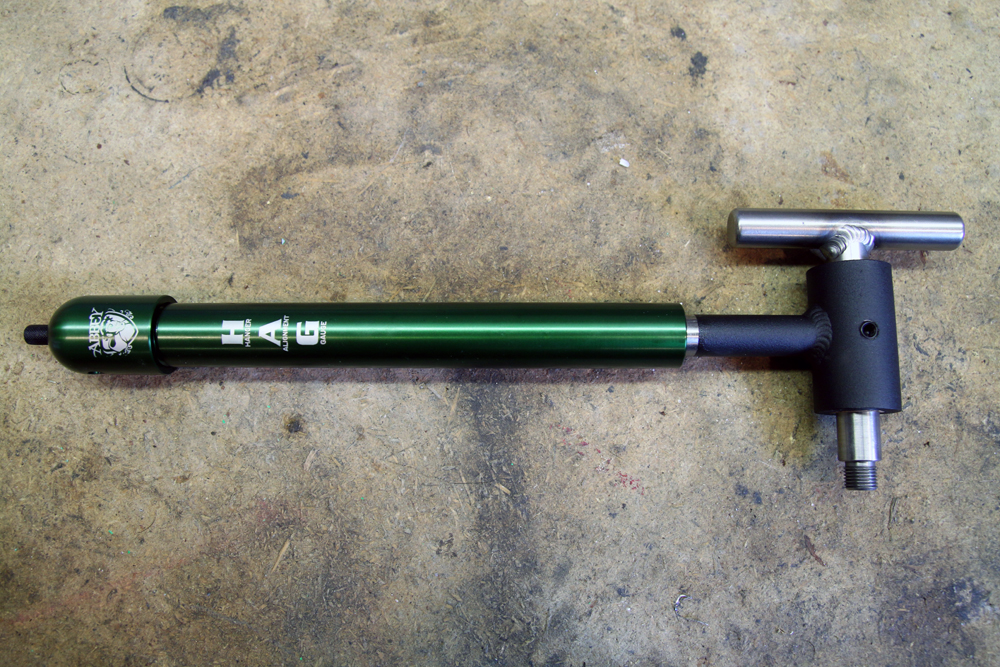
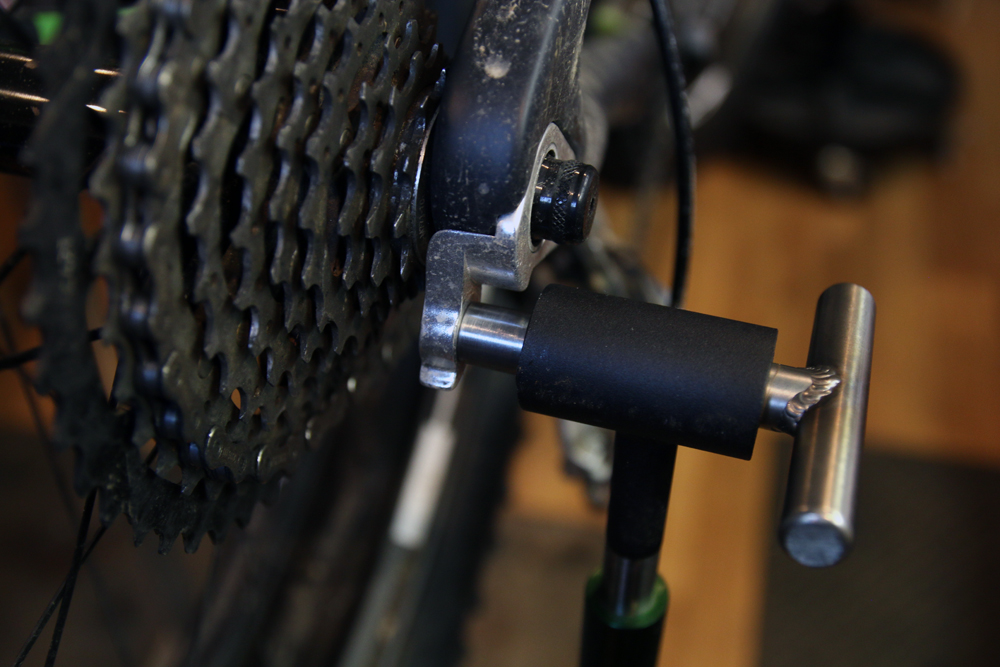
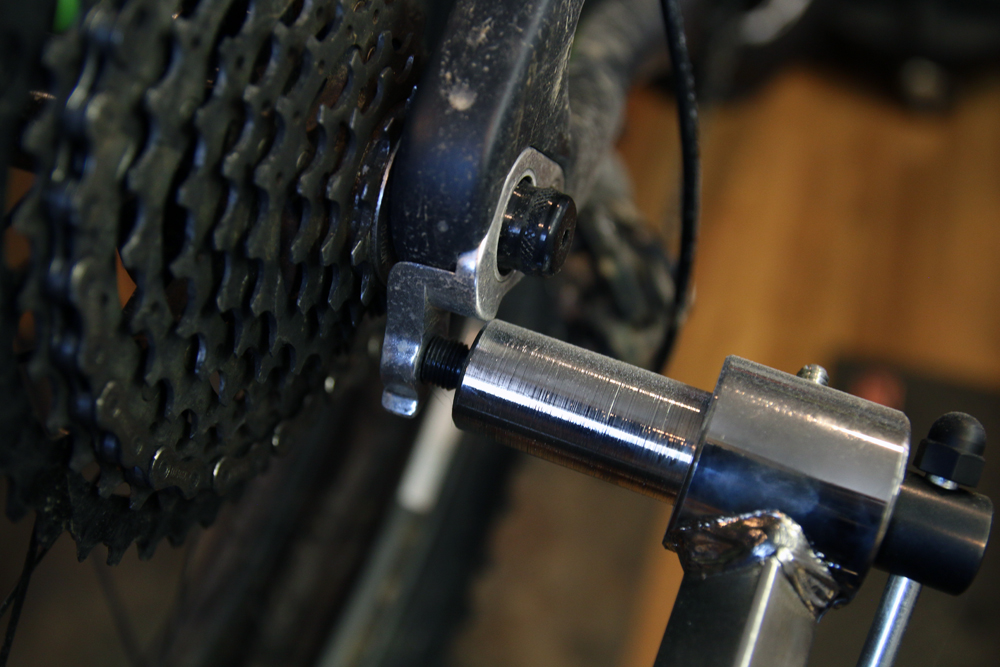
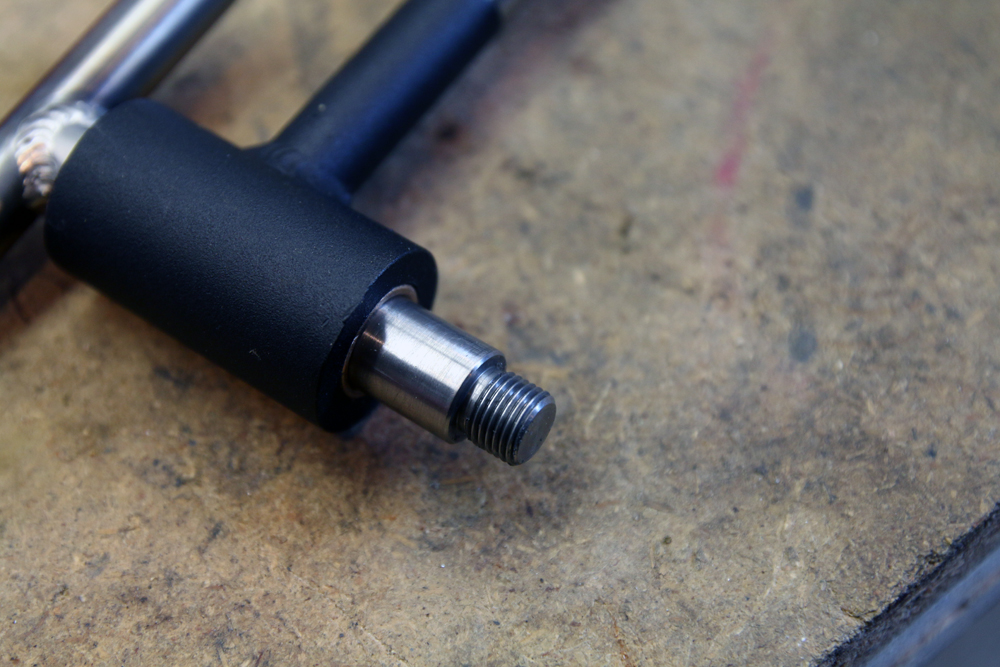
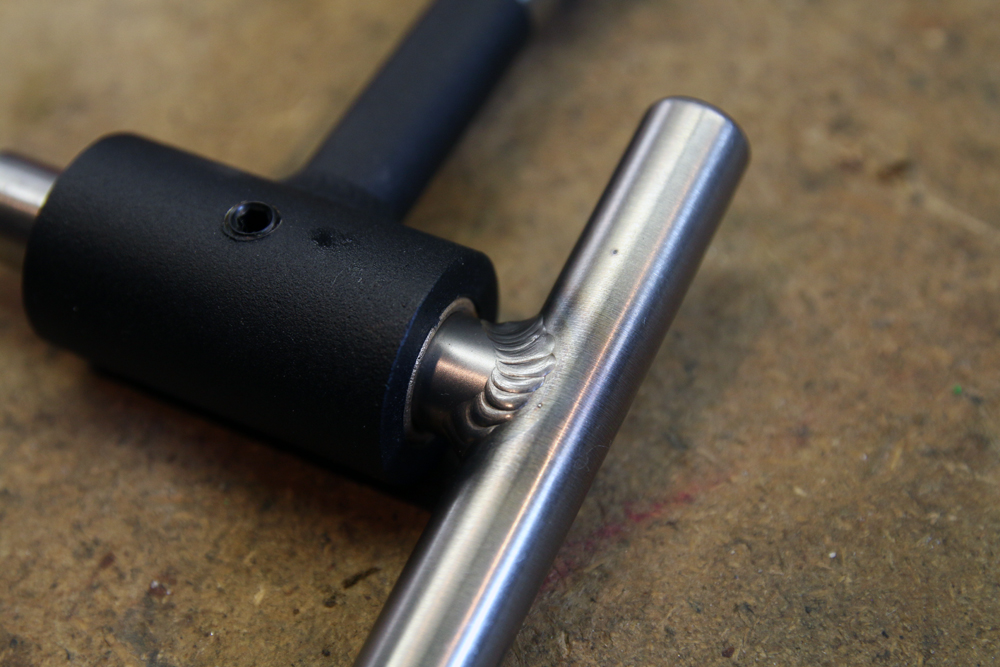
First and foremost, Jason builds his tools for the traveling mechanic. That means they have to be portable, but also extremely durable so they won’t break down in the field. To make the HAG as compact as possible, the feeler gauge stores in the handle with a knurled end that holds it in place with a friction fit. When you’re ready to use the tool, pull out the feeler, slip it into the horizontal bore, then thread the nut clockwise to lock it in place when you have your measurement.

The moving and adjusting of the feeler does have a bit of a learning curve, but once you have it down it’s like second nature.

Abbey Bike Tools HAG hanger alignment gauge derailleur  (14) Abbey Bike Tools HAG hanger alignment gauge derailleur  (15)

Due to the telescoping design of the tool, it packs up much more compact than something like the Park DAG-2 at just under 11 inches long, but still provides the full range of adjustment. Again perfect for the traveling mechanic, but also it will take up less room in your tool box at the shop. Even though the HAG is beautiful enough for me to want to stare at it all day, it gets kept in the drawer with the expensive tools like torque wrenches. It’s just too nice.

Abbey Bike Tools HAG hanger alignment gauge derailleur  (9)

Abbey Bike Tools HAG hanger alignment gauge derailleur  (7) Abbey Bike Tools HAG hanger alignment gauge derailleur  (6) Abbey Bike Tools HAG hanger alignment gauge derailleur  (8)

That telescoping design also means there is nothing holding the two halves of the tool together other than an o-ring seal, tight tolerances, and the vacuum it creates. You can easily pull them apart, but the vacuum inside the handle is strong enough to keep the bottom half from falling off if you need to grab something. It probably won’t stay there all day, but isn’t like it will fall right off.

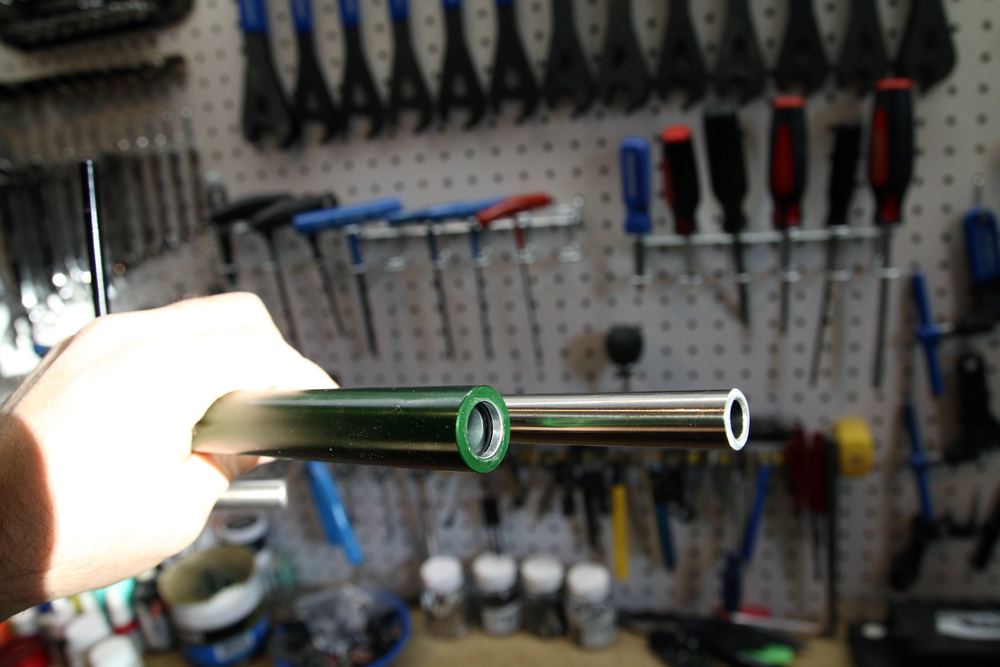
Those tolerances for the HAG are as tight as a 1/4 of a thousandth of an inch, or 0.0063mm. And you can feel it. Every part of the tool functions with silky smooth efficiency. Should you ever wear the tool out, it is rebuildable which means it should last a life time.

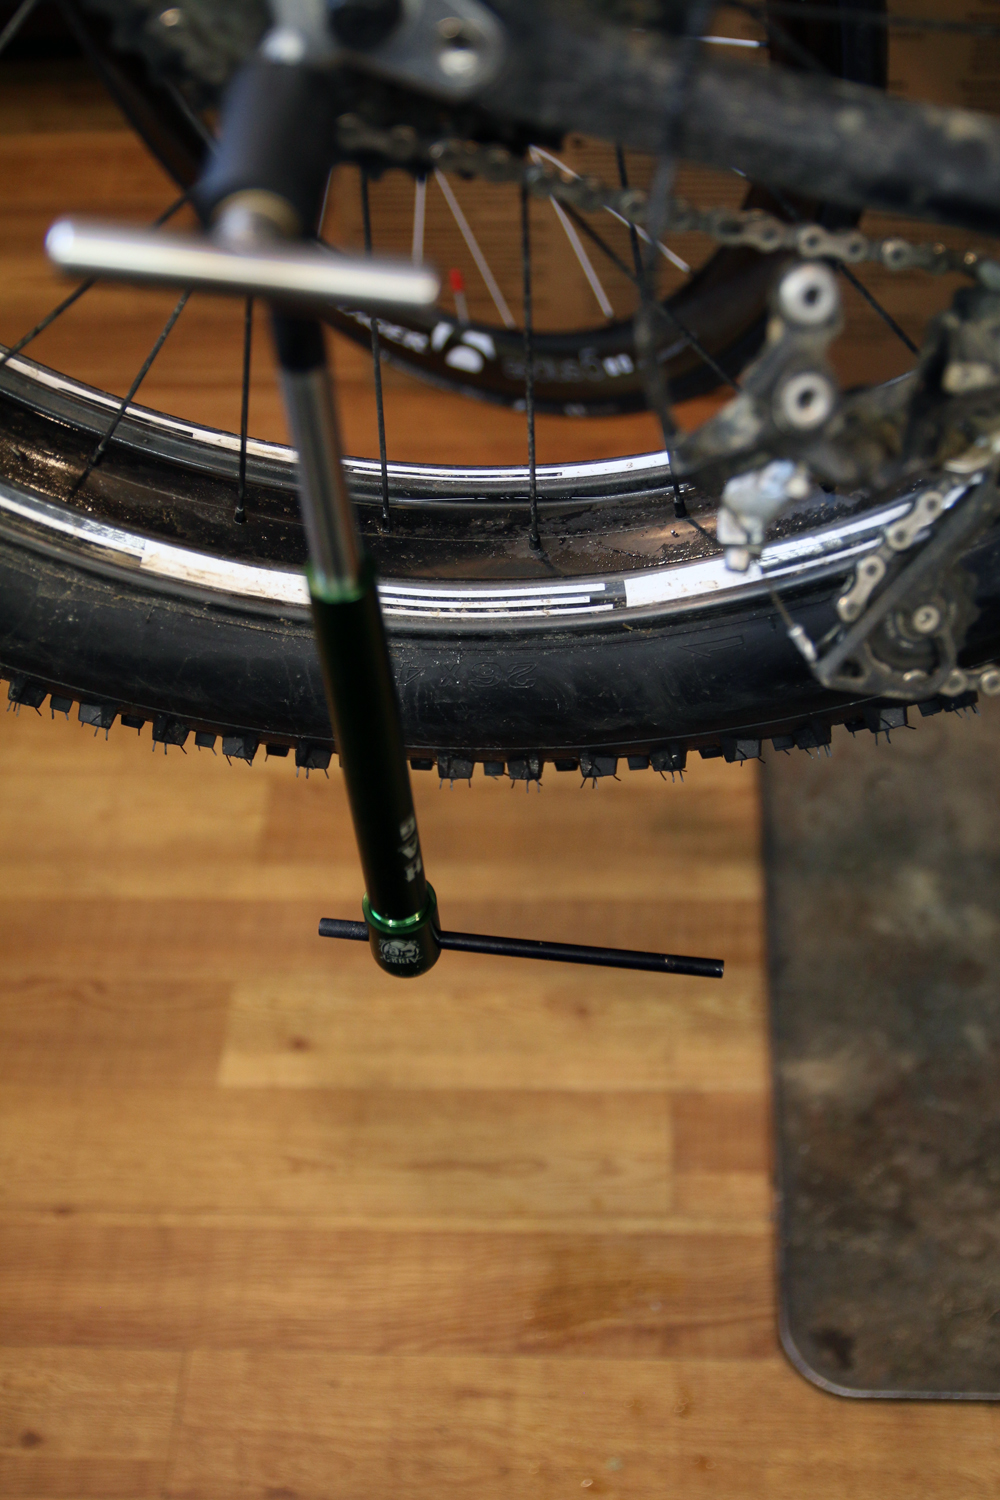
I put together a quick video to highlight the HAG’s ability to swivel while keeping the feeler gauge adjustment locked in place. Yes, I know that’s not how you align a derailleur hanger, the point is to show just how easy it is to work the tool around the frame. As far as I’m concerned this is one of the best features of the HAG, and greatly contributes to the ridiculous precision afforded by the tool. No fumbling with the derailleur and chain to get the feeler around it, no accidentally bumping the gauge on the tire or rim and losing your adjustment. Just simple, smooth accuracy.

Abbey Bike Tools HAG hanger alignment gauge derailleur  (4) Abbey Bike Tools HAG hanger alignment gauge derailleur  (5)

Abbey Bike Tools HAG hanger alignment gauge derailleur  (13)

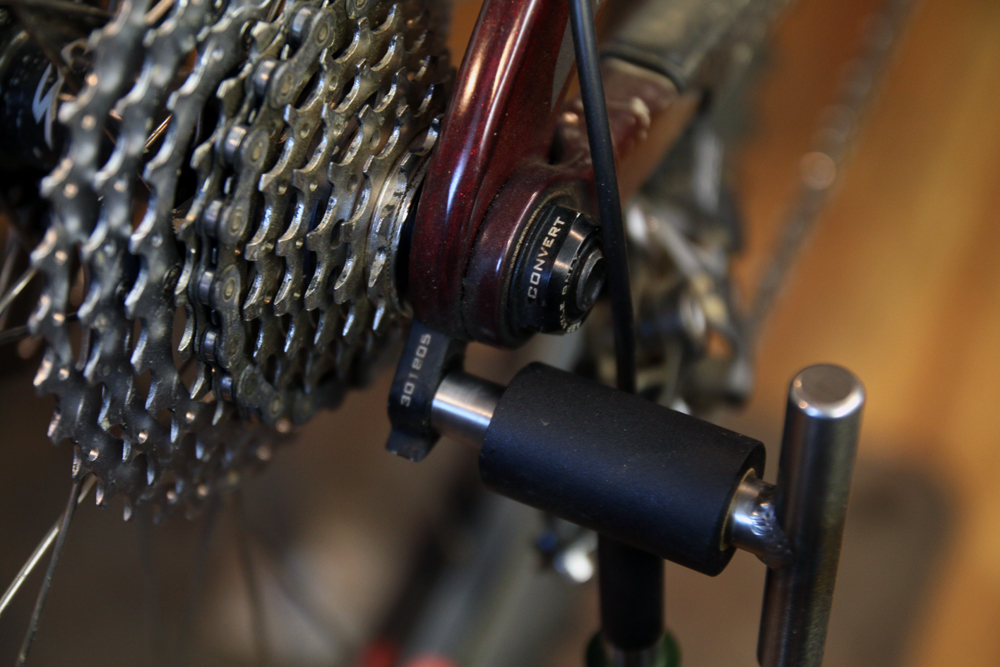
The other huge advantage of the HAG over competition? The fact that it seems to fit more bikes. Park updated the DAG with the no. 2 not all that long ago, presumably to fit bikes like the Trek ABP frames where the barrel was too big. While I sympathize with Park knowing how difficult it must be to design a tool that will work with every frame, I was still pretty bummed to find out that it didn’t fit our 9Zero7 Whiteout we have in for review.

I’m very happy to report however that the Abbey Bike Tool HAG fits perfectly. The Whiteout got a much needed hanger alignment, and all is well. So far I haven’t found a bike the HAG doesn’t fit. That doesn’t mean they aren’t out there but so far, so good.

Abbey Bike Tools HAG hanger alignment gauge derailleur  (12) Abbey Bike Tools HAG hanger alignment gauge derailleur  (10)

One place the Park DAG-2 definitely has the HAG beat is on price. At $170 the HAG is nearly 3 times the price of the DAG-2, and that’s OK. Looking at the tool in person and feeling the tolerances in your hands are all that’s needed for the right mechanic to know the price is worth it. While the HAG probably isn’t a tool that you’ll find on work benches at every local shop, it is the hanger alignment tool for the professional mechanic. As always with Abbey’s tools you get what you pay for, which means a quality, precision tool that’s built to last.

abbeybiketools.com

Subscribe
Notify of
guest

This site uses Akismet to reduce spam. Learn how your comment data is processed.

41 Comments
Oldest
Newest Most Voted
Inline Feedbacks
View all comments
wako29
wako29
9 years ago

I have this tool and this review is pretty spot-on. It is FAR more precise than the Park version (arguably the industry standard) but you do indeed pay for it. In the end though, this thing has blown me away and – most importantly – causes tool envy to other mechanics.
To Jason and Co: keep up the great work!!

StephenM
StephenM
9 years ago

A thousandths of an inch (0.001″) = 0.0254mm.

Seth
9 years ago

The issue with such a well made tool (and I do not condone the making of sh*tty tools) is that its precision is not relevant. Derailleurs have their own issues, and the face of a hanger has such a small area that even though your derailleur alignment tool is lined up with your wheel perfectly, your derailleur cage may not be lined up with your gears. I was presented with one of these for inspection a few weeks ago. It has incredible surface finish, the parts slide together air-tight, and it does an absolutely mediocre job at aligning derailleurs with gears, because the final alignment is not determined by the hanger, but by the derailleur. The only mechanic I would recommend this to would have the tiniest of toolboxes and be on the road day in and day out making fat stacks from aligning deailleur hangers.

mechanic
mechanic
9 years ago

Damn Seth, way to be a buzzkill.
Agreed, that the tolerances don’t matter quite that much since the force required to bend most hangers that should be bent( non-replaceable) usually results in over-correcting. Combine that with played-out threads and derailleur slop and cable contamination on a perfectly adjusted drivetrain- and the significance is almost nil.
But, GEEZUS- I consider my work as a mechanic an art- and as such, I like the concept of having beautiful and craft tools. If that is lost on someone, then said person should just buy Icetoolz.

Seth
9 years ago

My favorite derailleur hanger alignment tool is a Park Tool’s AWS-1, a firm grip, and a keen eye.

DropperURpost
DropperURpost
9 years ago

Are you sure that’s not the new Campy Dropper Seatpost?

1Pro
1Pro
9 years ago

0.0254/4=0.0063. he did say 1/4 of a thou of an inch

ZachOverholt
ZachOverholt
9 years ago

He was right 1pro, I forgot the 1/4 when it first published.

Geoff
Geoff
9 years ago

How does this compare to the Efficient Velo Tru Arc hanger tool? Anyone have experience with both?

Zeb
Zeb
9 years ago

#adjustablewrench

ShopMechanic
ShopMechanic
9 years ago

I’m afraid Seth is right on this one. As a parallel example, you can use a dial indicator to get a high quality rim straight to within +/- 0.05mm but at that point if you flip the wheel in the stand you’ll find that the rim width isn’t within +/- 0.05mm, so really the best true that can be achieved is around 0.1mm. It doesn’t mean that dial indicators are bad, I like to use them because they make the job a little easier. Likewise this tool is bad, I’d love to use it everyday, but it isn’t necessary to do a top notch job.

Steve
Steve
9 years ago

@StephenM – 1/4 of a thousandth of an inch = .00025 in. = .00635 mm

Steve
Steve
9 years ago

^ Sorry, just read through everything. To eager to correct someone.

topcheese
topcheese
9 years ago

yes please

Mike Bechanic
Mike Bechanic
9 years ago

@Seth: Your point regarding the cage’s relationship to the cogs is correct. However, it is arguable that if the cage doesn’t line up then the derailleur is bent and/or worn out (except sram derailleurs, more on that in a bit) and should be replaced. Aligning a hanger to work with a bent/worn derailleur is a band-aid and not a good practice. A hanger gauge assumes the derailleur is straight/not worn (which is reasonable) so a straight hanger gets you good alignment between derailleur and cogs.
The exception here is sram. I heard one of their reps mention that the cage “points” toward the chainline. If you look at a sram mtn derailleur you can actually see this. aligning a sram derailleur using your method doesn’t sound like results in good alignment unless you do it in the middle of the cassette.
One way or another a hanger gauge is way better way to bend the hanger.

Fraser Cunningham
Fraser Cunningham
9 years ago

Someone needs to make this tool, but with a bracket that offsets it to the center of the WHEEL! Then you can actually track it around the rim. DUH.. OK, I’ll make the bracket myself!

Blueberry
Blueberry
9 years ago

Reminds me of my personal favorite derailleur hanger tool, the old Dura Ace TL-RD10. Similar design but with a little machinist ruler instead of a rod to adjust to the rim. It’s so nice using a hanger too with no slop and easy, smooth action. I have no experience with this one but I’m sure it’s a joy to use.

BK
BK
9 years ago

@Seth: Obviously aligning a derailleur hanger doesn’t make up for a bent derailleur. But by aligning the hanger you are taking one more variable out of the equation. If you’ve aligned the hanger and the cage still looks bent and/or it’s not shifting properly, at least you know the hanger is not to blame. As somebody who has used a multitude of hanger alignment tools including the HAG, I can attest that it can be difficult to feel confident in that alignment with an inferior tool. The tiniest tic of play in the tool can throw off your alignment drastically, just as a slightly loose hub can make truing a wheel seem sisyphean. Does every mechanic need it? No. Am I glad I have it? Absolutely. Though I say that as a mechanic who is on the road frequently with a tiny tool box, frequently aligning hangers. I’d hardly say I or anyone else makes fat stacks doing it though…

Mile
Mile
9 years ago

Do they make a frame alignment gauge?

Mr. De Facto
Mr. De Facto
9 years ago

Like a hammer?

Star
Star
9 years ago

@ Blueberry Hozan c-336 ??

Gixxer
Gixxer
9 years ago

The problem I see with this tool is you can’t use it as a leverage to bend hanger back in place. The park tool is like a solid breaker bar.

The Goats
9 years ago

@Gixxer – that’s exactly what it is designed to do and excels at. We have used this tool to align up to possibly a dozen hangers a day (aluminum, steel) no issues at all. It replaced a Park unit for us as it is smaller and easier to pack for events. Works perfectly.

The Goats

http://createfolly.com/gevenalle-gives-all-to-cyclocross/

don
don
9 years ago

I like nice tools but one that is 3x $’s an existing tool I already own means it most likely won’t see my tool box. I do appreciate the craftsmanship.

don

David
David
9 years ago

If you don’t understand the nature and draw of ABW tools, they’re obviously not made for you.

BR
BR
9 years ago

Very nice tools and made in USA! Well done!

Bubbrubb
Bubbrubb
9 years ago

NERDS!!!! ONE.

Loki
Loki
9 years ago

@ BK Sisyphean! Perfect word for the comments section, made my morning! You win.

Ryan
Ryan
9 years ago

Reason #24 I love riding rigid SS: I don’t know or care what you all are talking about.

greg
greg
9 years ago

@Geoff
i use the EVT Tru Arc. it is very nice. it has a stop built in so its extension wont just slide all the way off.
i see the difference between the two in two key areas. one is the Abbey is designed to be ultra-portable. if that’s what you need, that’s what you should get.
the other one is from a retailer point of view. the Abbey tools are meant to be sold direct, and their price reflect that. they are about HALF the MSRP of EVT tools (for all that are complaining about the price of the Abbey!). EVT DOES have a wholesale list for professional mechanics, bringing it down to near-Abbey prices. some of you wont appreciate this at all, but i do. i think it comes from the owners’ perspectives on what’s important. Brett of EVT comes from a retail mechanic background, and i believe Jason? of Abbey comes from a race mechanic perspective. to each their own.
regarding the Shimano tool, Brett of EVT designed Shimano’s latest hanger alignment tool. the actual production version isstill not as precise as Brett likes, so he has an upgrade kit for it.
as for the hanger not needing to be that precise, well, yes and no. Campy says the required tolerance of a hanger is +/- 6mm when measured from an alignment tool to the rim. that seems a bit loose to me, but ill take it. the no part comes from the above comments. yes, the derailleur is ultimately what gets lined up to the cogs, but it is not the pulley cage that has to be exactly parallel to the cogs, it’s the hanger. the parallelogram has to be at the precise angle it’s intended to be or there will be more or less horizontal movement with each shift. if the derailleur is pointed left or right, you can get a situation where the adjustment is good in the small chainring but bad in the large one. and many, many other issues.
an aligned hanger is the foundation for proper derailleur alignment.

Dockboy
Dockboy
9 years ago

@Fraser Cunningham: If you were to make such a tool, I doubt you’d find any real improvement in alignment. Once the hanger is aligned, the plane of the rim sidewall should be parallel to the face of the hanger, so no matter the distance out the pry arm, the indicator should hold the same setting and measure the same gap.

The Goats
9 years ago

,

Regarding importance of alignment. For cyclocross there is little room for error to keep the derailleur out of the spokes once it is caked in mud. Checking to make sure you are not too close to the spokes but within tolerance to the outside can make for all the difference.

Cheers,

Goats

http://createfolly.com/gevenalle-gives-all-to-cyclocross/

greasyphysique
greasyphysique
9 years ago

Love this tool.The I purchased it preproduction last year and glad that I did. It feels good in your hand with zero flex and no odd ergonomics.The abiility to brreak it down for easy compact storage is just one of it’s many benefits.I often work in a shop and travel to work on team equipment so this huge for me. The price for an American made tool of this quality it totally worth it to me. This is one of the tools that I love getting out because it enoyable to use and extension of the pride I take in my work .

goridebikes
goridebikes
9 years ago

@Goats
how does this pertain to hanger alignment? distance between rear derailleur cage in easiest gear and spokes is set by limit screws, regardless of hanger alignment… a bent hanger or straight hanger can as easily be made to have a derailleur that doesn’t hit spokes..

hanger stiffness, frame tolerance, have way more to do with that particular issue, especially given that frame flex, derailleur pivot play, etc.. are all things that can easily make a well adjusted derailleur go into the spokes anyways.

I feel like this comment section in particular is a lot of mechanics trying to pretend they know something the rest of us don’t… your hanger needs to be aligned.
Bikes with properly aligned hangers shift better than those without.

Certainly, a cage or pulley or whatever can be off. But please, you incessant know-it-alls, stop acting as if there’s some exception to the need for a straight hanger. It should always be straight.

Rob C
Rob C
9 years ago

Looks like a great tool, and if funds permitted, would add to my toolbox.

For shop use we have 3 x park dag-2 and they job the job adequately, but always a little sloppy, which is more tricky now with many 11 speed bikes coming through the shop.

Always surprises me how many customers riding around with scraped rear mechs and bent hangers, wondering why their gears aren’t working!

The Goats
9 years ago

No worries @goridebikes. There is more to the Derailleur than just the top pulley. If you set the top pulley limit screw where it should be great, but if hanger is not straight the lower pulley might well end up not where it should be. As you say however, can’t go wrong with getting everything straight and where it should be!

Goats

ant1
ant1
9 years ago

@Steve *too eager

Lemond Rider
Lemond Rider
9 years ago

I use an older Efficient Velo hanger tool that works well. Their new tool is a bit pricey at $568. For those “doubters” out there – you always approach repairs from the bottom -up, so to speak. If the RD hanger is not aligned to the plane of the bicycle you can never get optimal shifting based on the quality of what you have before you.

crashagain
crashagain
8 years ago

Thanks for all if your comments! As a wannabe DIY mechanic, when I can’t get the derailleur adjusted for smooth and accurate shifting, the first things I consider are cassette damage/wear and the derailleur hanger. Not currently owning a tool, I have to run to my local shop and ask them to check the hanger. They have the park tool. Regardless, this comment string has really helped me understand additional subtle factors which I may not have the expertise to correct but I won’t be as frustrated and defeated when my efforts aren’t sufficient and I need my “real” mechanic. Regardless, im in the market for a tool to save me some gas, time and expense. I’m not in the market for “consumer” tools. We might not need tools to stand up to constant use but we need accuracy and precision if we’re actually going to get results. So, the reason I’m a wannabe is I’d rather be a wannabe with a nice bike than one with a lesser bike or no bike at all. In the end, I am the happy owner of a an awesome higher tech bike that needs more TLC and my mechanic/shop gets more business.SO my intent is to THANK YOU AND give you the perspective of the DIYer who may try your patience 😉

ProvocateurVelo
ProvocateurVelo
7 years ago

Thanks for the review. You say, “The moving and adjusting of the feeler does have a bit of a learning curve, but once you have it down it’s like second nature.” You don’t (unless I missed it) help us beat the curve by explaining what the difficulty is with the moving and adjusting of the feeler. Could you explain? Also, my hope is that the rotation allows the tool to swing past the frame stays, but neither your words nor the video seems to confirm that. There are many times when it’s helpful to get the tool handle near the seat tube for leverage. If this tool can do that without removing and reattaching then it might just be the tool I’m looking for.

Subscribe Now

Sign up to receive BikeRumor content direct to your inbox.

Subscribe Now

Sign up to receive BikeRumor content direct to your inbox.