For as long as there’ve been multi-mode rear shocks with some manner of pedal platform, I’ve been trying to set up my shock for optimum performance in “Pedal” mode. My thinking was, by running it in the middle setting, I could keep the shock ready for anything. Switch it one way to climb and the other to descend. In reality, that might just have been limiting the performance of the shock, not letting me get the most out of it.
Since all manufacturers suggest setting sag with the shock and fork in full open (or Descend, etc.) mode, it stands to reason you’re setting it up to perform best in that position, right? We asked Duncan Riffle (SRAM MTB marketing manager and former 2x Nat’l DH Champ), Eric Porter (veteran pro MTB’r, now riding for Manitou), Mark Fitzsimmons (Fox Racing Shox’s pro athlete suspension tuner) and Josh Coaplen (Cane Creek’s VP of engineering).
First up, a little clarification of what exactly we’re talking about: When you’re setting your fork or shock to a particular mode (open, descend, trail, pedal, climb, whatever), you’re changing the low speed compression. For Fox forks, that means anything in the zero to five inches per second compression speed. Other brands are likely similar. This affects the suspension’s performance when you’re braking (at the fork), pedaling hard or while standing, railing corners and rollers and anything else that’s not a quick hit or hard landing. Those quicker, bigger hits are controlled by your high speed compression, and most products out there have fixed high speed circuits that are not easily user tunable. Cane Creek’s Double Barrel is the obvious exception.
We started this series with a look at setting your sag properly in Part One, now it’s time to tune those compression settings…
An important point to make before we get started is that your fork and shock settings likely need to be different since their behavior affects the bike in very different ways. We’ll start with the shock, which everyone says should generally be run wide open.
SHOCKS
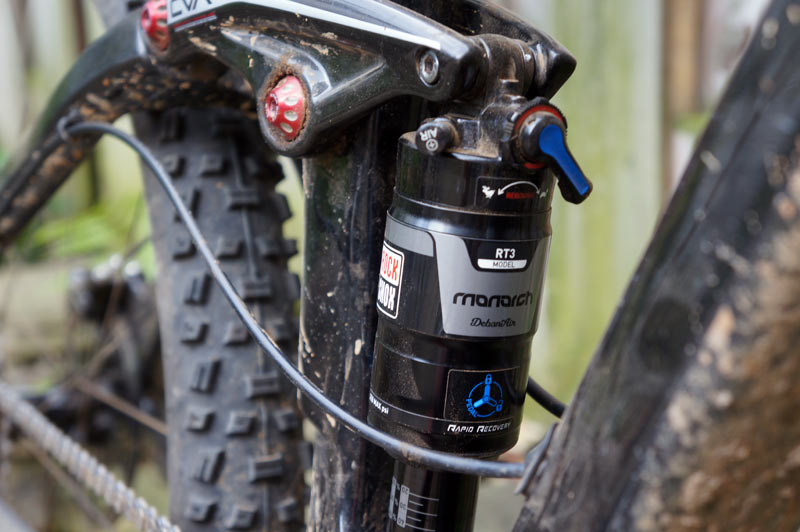
“When we’re talking about a shock like the Monarch with three different settings -open, pedal and lock- it’s going to be most supple and most reactive when you have it open all the way,” says Riffle. “If ‘trail’ is the only type of riding you’re doing, then you want the shock set up to work as well as possible for that type of riding, and you’ll get that by keeping the shock fully open. You’re going to have the most control, it’s going to stick to the ground better and simply work the best.
“The full open position is really the shock’s neutral setting. That’s where it’s performing the way it’s supposed to, the way the engineers designed it to work. The ‘pedal’ setting is just that, for when you need a bit firmer platform to get up and pedal or hustle.
“But as soon as you start seeing more diverse terrain -roots, rocks, sharp edges- you’re increasing the shaft speed of your shock. So you want your settings to be open so it absorbs those bumps rather than resists them. That means the shock is taking the hit and absorbing that energy rather than you, the rider, which is why we have suspension in the first place.”
Coaplen offers a similar opinion:
“What we’ve run across is there are two camps on this, and it really comes down to preference. As a rider, do you consider ‘up’ and ‘horizontal’ the same? There are some riders that consider any flat sections the same as ‘climbing’, then run the Climb Switch all the way to the start of the descent. If you ride the flats like you do the downhills, actively hammering the bike through the turns and moving around a lot, then you’d only use the Climb Switch on the actual climbs. Most of our product’s riders lean toward the more aggressive side and tend to only flick the Climb Switch on while ascending.
Meanwhile, Fox offers a variation on that, suggesting beginner and average riders start with that middle setting, then adjusting based on trail conditions.
“You’re going to get the best bump absorption performance wide open, for sure,” says Fitzsimmons. “Mountain bike suspension is unique as it sees more than terrain inputs. It almost equally sees rider input, as well. (The low speed compression velocities) are affected by rider input such as pedaling motion, pumping, and out of saddle pedaling. The middle setting is helping mitigate pedaling influence rather than bump absorption, so use it when appropriate.”
But, Fox’s PR manager Mark Jordan expands to say that for more experienced riders, it may make more sense to set it up in the mode you’re going to use. So, if you’re only seeing more XC-ish trail without a huge variation between climbs and descents, then it is indeed perfectly OK to set it all up in and leave it in Descend mode since that’s where the suspension works best. Or even to set sag in Trail mode if you’re going to be pedaling constantly. But, if you’ve got a wide range of inclines and declines to deal with, the additional settings can be used to create a firmer feel when desired.
Coaplen adds: “Anytime you’re not adjusting your suspension for the trail conditions you’re actually on, you could argue you’re compromising your performance.”
It also depends on the bike. With more active suspensions (like FSR), you might end up using the climb mode more frequently. On others, the Trail/Pedal/Middle mode might be plenty adequate to provide a more solid platform without ruining the shock’s ability to track terrain on the climbs.
FORKS
It’s worth noting that most bicycle manufacturers work closely with the suspension brands to custom tune shocks for a particular frame. This includes internal shim and port sizes, air canister size or coil spring rate and other details that get things in the right ballpark for the leverage ratio and intended use of the bike. That’s not the case with forks – what you’re buying aftermarket is almost certainly the exact same fork that comes spec’d on a wide variety of bikes, so it’s even more critical that you find the right settings for your bike and riding style.
Where rear shocks are taking a secondary hit, the fork is charged with absorbing impact and keeping the front end under control. And we don’t mean steering – it has to prevent diving in while simultaneously floating over the little stuff to maintain traction. Set it too soft and it’ll dive under braking, limiting it’s effectiveness, or tip the nose too low in a G-out or off a drop, potentially sending the rider over the bars.
Part of the solution is to set it with slightly less sag than the shock, which we discussed in Part One. The other is allowing it to have a bit of platform, as opposed to it running full open like the shock. To get that “platform” is pretty easy, just dial back the low speed compression settings a few clicks from full open. A well designed adjuster, which most modern forks have, creates the impression of a platform with only minimal impact on high speed compression.
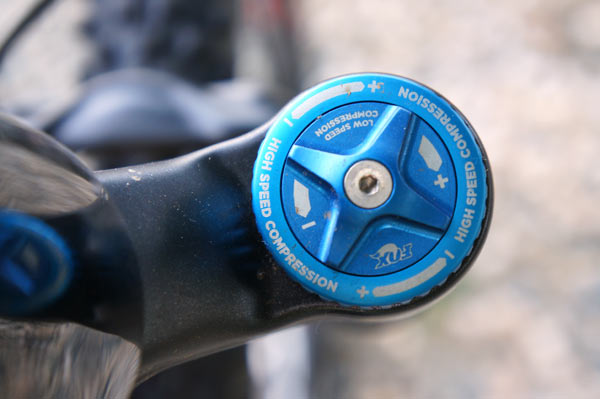
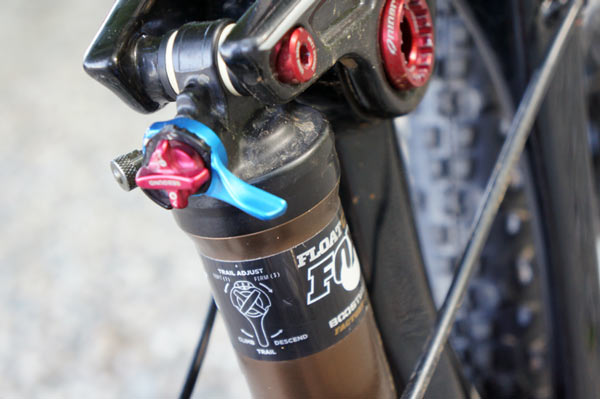
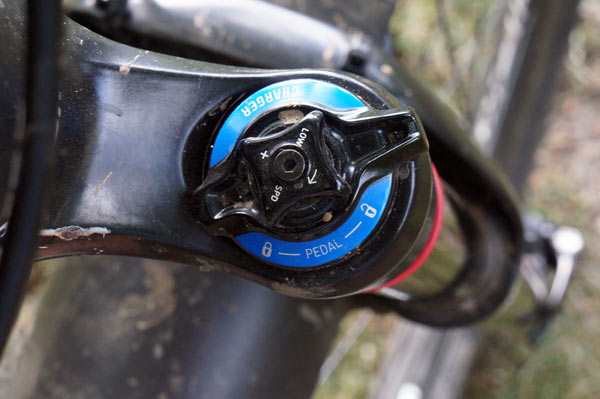
There are a variety of controls available from different brands, but most offer some manner of low speed compression adjustment. It could be in dial form, as found on the Fox 36 shown directly above or Manitou’s below, that allows a lot of variation between full open and closed. Or it could be in fixed increments, like their CTD, or the Rockshox Charger Damper RCT3, which provides a top level Open/Pedal/Locked with a secondary low speed control knob to fine tune that middle setting.
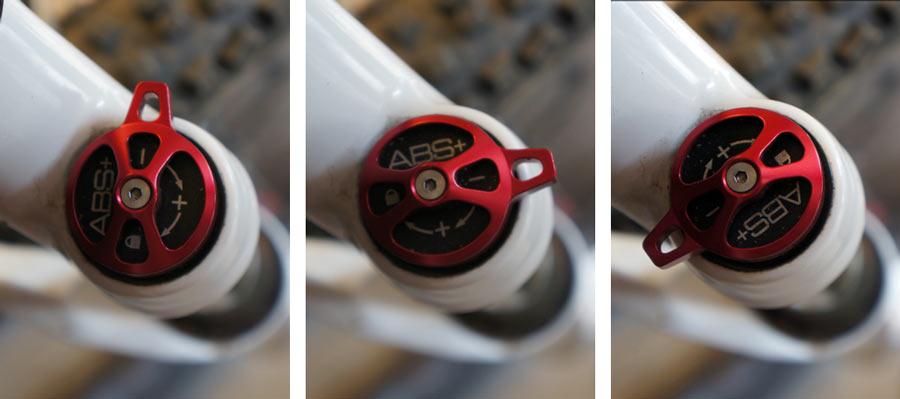
Manitou’s longstanding ABS+ is a simple low speed compression adjustment. The middle pic shows my preferred setting, about three clicks from full open. Their new Mattoc adds high speed compression controls with their new MC2 damper, as does the Fox 36’s dual dial.
Most riders we’ve talked to like running Fox’s forks in Trail mode, even on the descents, since the Descend mode can blow through the travel a little too easily. Porter, who rode for Fox before Manitou, says “Sometimes Trail mode on the downhills actually feels better than descend because it has more damping control and will stay higher in the travel.
“If you are a ‘set it and forget’ it type of person, I would recommend trail mode, or on the Manitou Mattoc and McLeod that I run, this would be one click in from fully open. This will keep it smooth on the trail, keep you riding high in your travel, and still be open enough for good small bump sensitivity and good feel on big hits.”
Fitzsimmons concurs: “With CTD, you have Climb, Trail and Descend modes, and on the top Factory level product, Trail has its own three settings (T1/T2/T3). The average rider should start in “T2″ position. This is basically the middle compression setting.”
That’s the trick – keeping the fork riding high in its travel. Not only does it keep your geometry and riding position the best, but it keeps the fork in its most supple position and ready for action when the going gets really rough. Adding a bit of low speed compression damping achieves just that.
ADDITIONAL THOUGHTS
Being able to fine tune the fork’s characteristics to your liking is a solid reason to upgrade to a model with these controls versus something with a simpler on/off lockout. That said, in recent years some brands have moved towards a simpler-is-better approach even on their high end forks. Magura, for example, has a very simple locked-or-open control, but their 2014 models have improved the dampers to help keep it from diving too quickly into its travel. And a lack of adjustment range doesn’t mean you don’t have any control over the fork’s feel – we’ll look at other tuning options in the next installments of this series. It’s just something to be aware of when you’re suspension shopping.
For me, I’ve found that running a bit more sag and opening up my shock all the way on the 100mm travel Niner JET 9 gave new life to the bike. It does sit just a teensy bit lower, but the smooth, supple action more than makes up for it. On my 125mm travel RIP 9, which is currently set up with a 150mm Fox 36 fork, the shock feels a bit overpowered on the biggest, fastest hits, which meant I spent more time in the Trail setting to help it out a bit. That could mean the bigger fork is just letting me push that shock’s stock tune harder than it was meant to go, or I just need to look at other adjustments. Fortunately, there’s plenty more that can be done…and we’ll discuss that later in the series. For now, try moving your shock to the most open setting and experimenting with your fork’s low speed compression settings to see if you can gain a bit more performance out of your own set up!